A Complete Guide to Windows RDP (Remote Desktop Protocol)
Posted: Mon May 11, 2026 11:04 pm
All Windows computers come pre-installed with Remote Desktop
Connection. You can find this by going to Start and typing “Remote
Desktop Connection” or “mstsc.” Once you see Remote Desktop Connection,
click on it to open.
 Remote desktop Connection
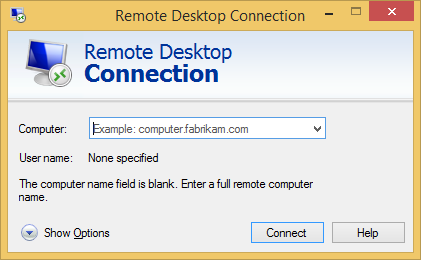
When you have opened Remote Desktop Connection, you must enter the
computer name or IP address of the computer/server. Once you have
entered either one, then click Connect.
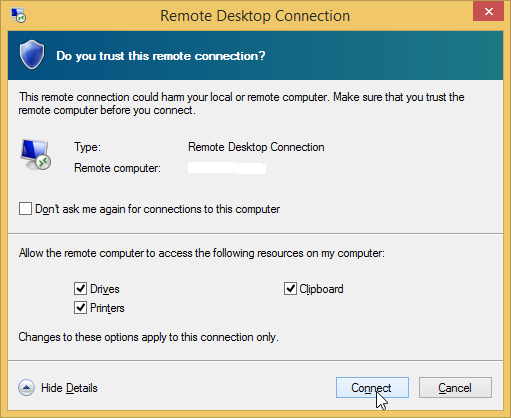
Once you have clicked on Connect, you will be prompted if you trust
this connection. If you do and do not want to see this message again,
check the box beside “Don’t ask me again for connections to this
computer.” Also, if you would like to connect your local drives,
printers, or clipboard, click on the Show Details at the bottom left.
 Details
After clicking on Show Details, you will be able to check the boxes of which ones you would like connected as well.
 Details
After you are done choosing which options you would like, click on Connect. You will then be prompted for the Username and password to log in to your remote computer/server.
 Windows security
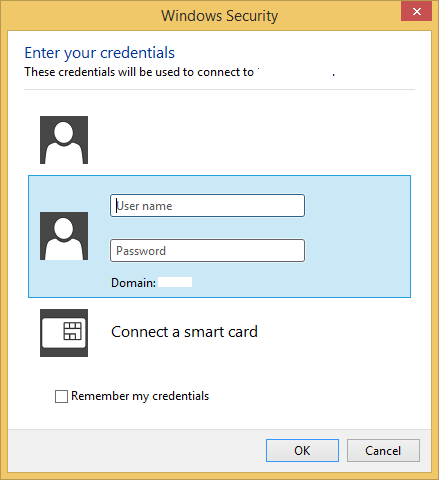
Once you have entered the Username and Password, you can check the
box next to “Remember my credentials” if you want to. Once you are
ready, then click on OK.
Now you should be connected to the remote server.
Remote Desktop Protocol Tips
As you can see, RDP as a basic tool is straightforward. To connect to
your server remotely using Remote Desktop Connection on a Windows
computer, type “remote” into the search box of your start menu. Once the
program is opened, type in the machine you want to access and hit
“Connect.” That is all.
However, entering the Options menu – accessible through the main
window – allows you to control additional features. Ryan Dube of
MakeUseOf assessed a few of those options so that you can understand the
fuller potential of the Windows software.
Changing the display
Frequently RDP defaults to a window that does not take up the entire
screen. Especially on big monitors, this aspect can be annoying. You
want a full visual of the environment, and all you get is a window that
fills 50% of your screen, if that. It’s challenging to work with that
small viewing space to have several windows open simultaneously.
How to solve the size problem? Before connecting through RDP, access
the Display menu (within Options) and slide the setting to the
right-hand side. Once you have done that, you should see the words “Full
Screen” appear within the window. Additionally, if you have multiple
monitors connected, you now have the option to utilize all of them for
the remote session.
Using local resources
Another potential element of frustration when using a Remote Desktop
connection is that some Windows shortcuts don’t work. For example,
control-alt-delete (to end processes, log off, etc.) and alt-tab (to
switch between windows) are nonfunctional. However, this issue can be
resolved as well.
Enter the Local Resources menu. Under the Keyboard heading, you will
see the option to use Windows key combinations when the display is set
in particular ways.
Accessing additional devices
You also have the ability to use thumb drives or other media while
connected remotely. Within Local Resources, you will see a Local Devices
heading. Click “More.” Now you will see various options for media that
can be accessed during RDP
Connection. You can find this by going to Start and typing “Remote
Desktop Connection” or “mstsc.” Once you see Remote Desktop Connection,
click on it to open.
Remote desktop ConnectionWhen you have opened Remote Desktop Connection, you must enter the
computer name or IP address of the computer/server. Once you have
entered either one, then click Connect.
Once you have clicked on Connect, you will be prompted if you trust
this connection. If you do and do not want to see this message again,
check the box beside “Don’t ask me again for connections to this
computer.” Also, if you would like to connect your local drives,
printers, or clipboard, click on the Show Details at the bottom left.
DetailsAfter clicking on Show Details, you will be able to check the boxes of which ones you would like connected as well.
DetailsAfter you are done choosing which options you would like, click on Connect. You will then be prompted for the Username and password to log in to your remote computer/server.
Windows securityOnce you have entered the Username and Password, you can check the
box next to “Remember my credentials” if you want to. Once you are
ready, then click on OK.
Now you should be connected to the remote server.
Remote Desktop Protocol Tips
As you can see, RDP as a basic tool is straightforward. To connect to
your server remotely using Remote Desktop Connection on a Windows
computer, type “remote” into the search box of your start menu. Once the
program is opened, type in the machine you want to access and hit
“Connect.” That is all.
However, entering the Options menu – accessible through the main
window – allows you to control additional features. Ryan Dube of
MakeUseOf assessed a few of those options so that you can understand the
fuller potential of the Windows software.
Changing the display
Frequently RDP defaults to a window that does not take up the entire
screen. Especially on big monitors, this aspect can be annoying. You
want a full visual of the environment, and all you get is a window that
fills 50% of your screen, if that. It’s challenging to work with that
small viewing space to have several windows open simultaneously.
How to solve the size problem? Before connecting through RDP, access
the Display menu (within Options) and slide the setting to the
right-hand side. Once you have done that, you should see the words “Full
Screen” appear within the window. Additionally, if you have multiple
monitors connected, you now have the option to utilize all of them for
the remote session.
Using local resources
Another potential element of frustration when using a Remote Desktop
connection is that some Windows shortcuts don’t work. For example,
control-alt-delete (to end processes, log off, etc.) and alt-tab (to
switch between windows) are nonfunctional. However, this issue can be
resolved as well.
Enter the Local Resources menu. Under the Keyboard heading, you will
see the option to use Windows key combinations when the display is set
in particular ways.
Accessing additional devices
You also have the ability to use thumb drives or other media while
connected remotely. Within Local Resources, you will see a Local Devices
heading. Click “More.” Now you will see various options for media that
can be accessed during RDP